-
-
products
-
resources
-
support
-
company
-
How to fix ‘Internet Explorer has stopped working’ error message in IE 10
By Davide De Vellis November 18, 2013error message, internet explorer, microsoft, windows, Windows 7, windows 8, windows vista, Windows XP10 CommentsOne of the most common complaints among Internet Explorer version 10 users is its continual crashing. One minute you will be happily browsing the Internet, and the next you will receive a message stating, “Internet Explorer has stopped working and needs to close.” If this scenario sounds all too familiar, here are some tips and tricks that may just help you solve this problem.
The number one reason Internet Explorer (IE) encounters problems is the introduction of Add-ons, Toolbars, Extensions, Junkware, and Spyware. Sometimes these programs can be reset or disabled by changing preferences in Internet Explorer, but often times disabling these programs does not solve the issues of IE crashes.
*Unless noted, these instructions will work for Windows XP, 7, and 8 Operating Systems
- First, make sure the Internet Explorer is completely shut down. Do this by closing any IE windows you have open. Next open the Task Manager by hitting the Shift + Ctrl + Esc buttons simultaneously.
- When the Task Manager window opens, look for any “iexplorer.exe” tasks that are running. Highlight these tasks and press the End Task button.
- Now that you have stopped all Internet Explorer processes, you will now need to open Internet Properties.
- Open the Start menu and click on Control Panel. Then locate and click on Network and Internet Connections. Next click on Internet Options.
- Now, locate the Advanced tab on the top right. Click to select the Advanced tab.
- Scan down the Advanced tab window and you will see a button that says Reset below the prompt to Reset Internet Explorer Settings. Click on the Reset button.
- A prompt will now appear that asks you if you are sure you want to reset all the Internet Explorer settings. Have no fear, this is exactly what we want to do. Verify by clicking Reset at the bottom of the warning window.
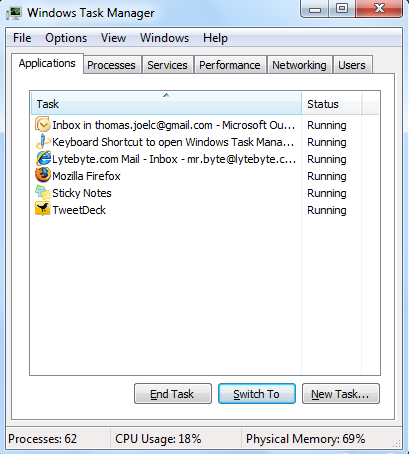
“The Task Manager will show you all active programs”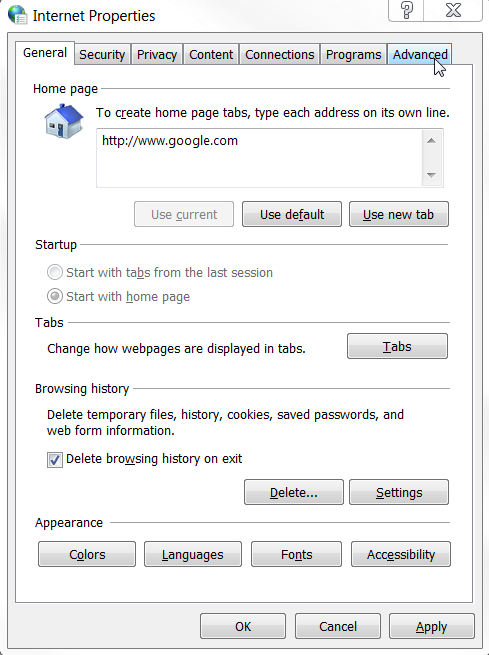
“Internet Properties will give you many Internet related options”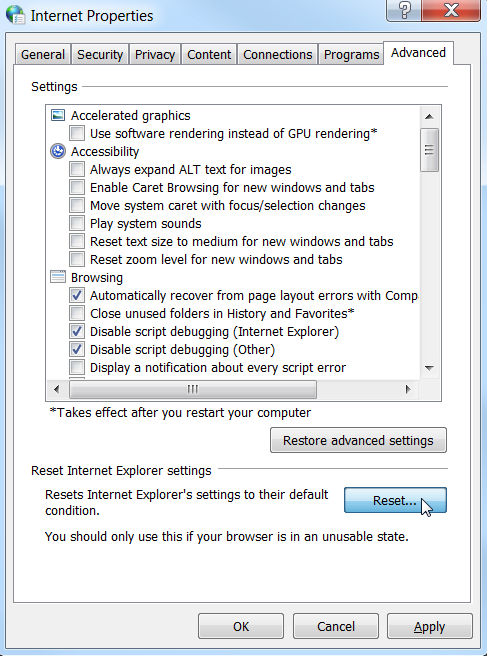
“Reset your Internet Explorer settings”At this stage you have reverted IE to the state in which you initially installed it sans add-ons and the like. It should now function as it did when the IE 10 was first installed.
If for some reason, you are still receiving the Internet Explorer has stopped working warning message, you may have to dig a bit deeper to fix the issue. In this case, you must tap into msconfig to remedy the problem.
Below are the Internet Explorer msconfig fix instructions for Windows XP, Vista / 7, and 8:
- Click the Start button and select Run from the menu. In the Run menu, type “msconfig” and hit Enter.
- This will open the System Configuration Utility. Under the Selective Start Up area, uncheck Load Start Up Items.
- At the top of the window, select the Services tab. and put a check in the box next to Hide All Microsoft Services.
- Next select Disable All, click OK, and restart your computer.
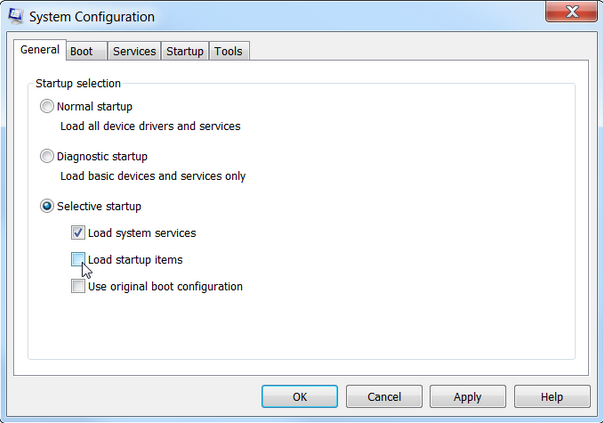
“The Windows System Configuration Utility screen”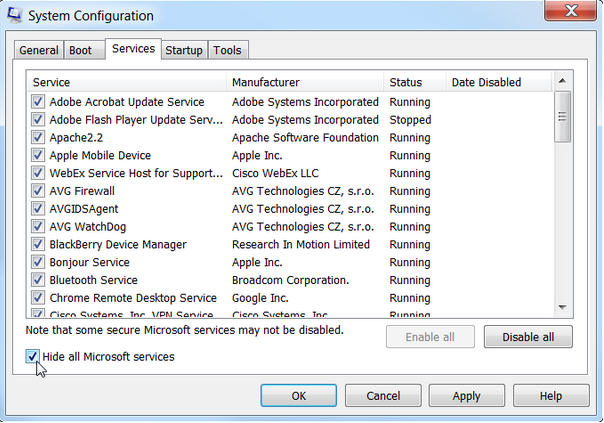
“Choose Hide All Microsoft Services”In doing this you have just disabled all non-essential services. The goal of this procedure is to give Internet Explorer a trial run without enabling useless programs upon start up. This will help you determine what is corrupting your Internet Explorer runability.
- After the computer restarts, re-open the msconfig Services tab following the same instructions in step 1 and 2.
- Verify that the Hide All Microsoft Services box is still checked. Then check the boxes in only the top half of the Services menu.
- Reboot the computer again and launch Internet Explorer.
- Check for crashes, make sure Internet Explorer is working properly. If it is, this means the unruly service is within the unchecked half of the Services menu.
- To verify, again open the msconfig Services menu. Verify the Hide All Microsoft Services box is still checked. Now uncheck the boxes you checked earlier. Check the boxes in the half you left blank in the last test.
- Reboot and launch Internet Explorer, if there are issues or there is a crash, this confirms the issue lies within a Service that was checked upon our current. test.
- Now it is time to narrow down the search of which “Service” is faulty by repeating the above test until only one service is causing a crash or Internet Explorer has stopped working message.
- Once you have found the faulty service, open the msconfig Service menu and uncheck the faulty “Service”. Reboot your computer and launch Internet Explorer. Check for crashing or other error messages. If you still encounter an error message, repeat the msconfig Service check, keep in mind there may be more than one Service causing issues within Internet Explorer
*Note: Always make sure you reboot your computer after each trial run.
Hopefully you will no longer encounter the “Internet Explorer has stopped working” error message. If so, simply repeat this quick and easy clean-up process.
Was this post helpful?YesNoFree Driver Updates
Update your drivers in less than 2 minutes to enjoy better PC performance - Free.
Free Driver Updates
Update your drivers in less than 2 minutes to enjoy better
PC performance - Free.
Didn't find your answer?Ask a question to our community of experts from around the world and receive an answer in no time at all.most relevant recent articles Pin It on Pinterest