| Ние се стремим да локализираме нашия сайт в колкото се може повече езици, колкото е възможно, но тази страница в момента е машина за превод, използвайки Google Translate. | близо |
-
-
продукти
-
източници
-
поддръжка
-
компания
-
Присъединете се към Workgroup в Windows XPJoin a Workgroup in Windows XP
От Steve Horton Октомври 08, 2012network, Windows XP, workgroupНяма коментариСъздаването на работна група на голяма мрежа от компютри прави по-лесно за всеки от тази работна група да комуникира и да получава достъп до файловете и папките на всеки член на работната група. Това е лесен начин да стартирате локална мрежа между машините на Windows XP.
Присъединете се към работна група на Windows XP
- Кликнете върху Старт
- Кликнете върху Контролен панел
- Кликнете върху Система и поддръжка в левия панел
- Кликнете върху Система
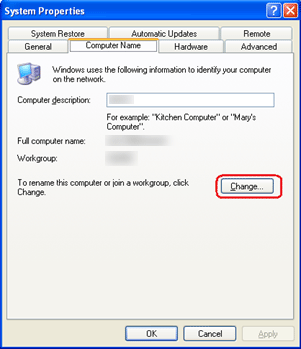
- Кликнете върху връзката Промяна на настройките в долния десен ъгъл на прозореца, след което ще се покаже диалоговият прозорец Име на домейна / домейн
- Кликнете върху Промяна …
- Изберете опцията Работна група от прозореца и въведете името на работната група, която искате да създадете или да се присъедините. Всички компютри в работната група трябва да имат същото име на работната група.
- Кликнете върху OK . Тази опция се намира в раздела за членове
- Отхвърлете трите последователни изскачащи прозорци, като щракнете върху OK три пъти
- Кликнете върху Затвори в долната част на полето ” Свойства ”
- Рестартирайте компютъра си, за да влезе в сила промените
Сега, когато сте част от работна група, можете да получите достъп до файлове и папки на работната група и лесно да общувате с всеки член. Можете да проверите членовете на работната група, като кликнете върху Старт , след това върху Мрежа .
Споделяне на файлове между два или повече компютъра в една и съща работна група
- Кликнете върху Старт
- Кликнете върху Моят компютър
- Под ” Инструменти ” кликнете върху Опции за папки
- Кликнете върху раздела Изглед , след което изберете Използване на споделяне на обикновени файлове
Сега намерете папка или файл, който искате да споделите с други хора в една и съща работна група.
- Кликнете с десния бутон върху файла или папката и кликнете върху Споделяне и сигурност …
- Под Споделяне на мрежи и защита изберете Споделяне на тази папка в мрежата
- Ако искате други хора в мрежата да могат да променят файла, изберете Разрешаване на мрежовите потребители да променят файловете си
- Кликнете върху OK
За да отворите споделен файл или папка на другия компютър:
- Кликнете върху Старт
- Кликнете върху Моят компютър
- Под Други места кликнете върху Мрежата в мрежата
- Щракнете двукратно върху името на другия компютър и ще видите споделения файл или папка.
Was this post helpful?YesNoБезплатно Обновяване на драйверите
Актуализирайте драйверите си за по-малко от 2 минути, за да се насладите по-добре PC производителност - Безплатно.
Безплатно Обновяване на драйверите
Актуализирайте драйверите си за по-малко от 2 минути, за да се насладите по-добре
PC производителност - Безплатно.
Не намерихте отговор на въпроса си?Задайте въпрос към нашата общност от експерти от цял свят и да получи отговор в нито един момент на всички.most relevant Последни статии Компания| Партньори| EULA| Правна информация| Не продавайте/не споделяйте моята информация| Управление на моите бисквиткиCopyright © 2026 Corel Corporation. Всички права запазени. Условия за ползване | поверителност | CookiesЗакачете го в Pinterest

